2nd February 2011
M31The mount (ASA DDM60) is back from the upgrade in Austria and appears to be working very well. This is the first image with the 10" scope on the mount.
There is some distortion showing in the stars. Dim stars are OK but larger ones show an asymmetry. I suspect this is due to a problem with the position of the new larger secondary mirror (63mm). I fitted the new secondary in an attempt to get a larger flat field of view. Out of focus diffraction images showed some weird defects so I have removed the mirror and intend to make a more accurate placement.

Enlarged view showing distortion.

| Bright star inside focus | Outside focus | Theoretical perfect diffraction pattern. | |
 |
 |
 |
|
| Obviously something is very
wrong! The secondary was removed and I made a template with cross hairs showing where the optical centre should be. (Note the 3mm offset) The first step is to position the secondary so that the paper card ellipse looks circular and concentric with the aperture of the focuser. Further adjustments are then made to get the laser focuser beam directed so as to hit the intersecting cross hairs and reflect onto the centre of the main mirror. |
|||
 |
|||
8th February Scope reassembled and tested. The defects remain. Collimation is excellent and is unlikely to be the problem. The scope did not show this defect with the smaller secondary, so the problem is either due to a faulty secondary, or the main mirror is pinched in the mirror cell. It was taken out of the cell for cleaning so this is a possibility. Left image is inside focus - defect at top left Right image is outside focus. Defect shifts to bottom right. |
|||
 |
|||
| If I check the main mirror fastening
clips for over-tightening and replace the mirror rotated through 90 degrees,
then I can decide if it is the main or secondary that is at fault. |
|||
| |
|||
| Below are sample star images with the 10 inch main mirror and the smaller secondary (50mm). These are almost perfect round star images, showing that the main mirror is capable of good results. | |||
 |
Normal size | ||
 |
|||
10th February
The main mirror - Foucault test image showing the classic 'Doughnut' shape.
There does not seem to be a problem here so the secondary may be the culprit.
The arrows show the fastening clip positions where most strain should occur, but none is seen.
The finger of suspicion is now firmly on the secondary...

Picture of the image of the pinhole formed by the main mirror. The pinhole is acting as an artificial star.
The pinhole was made with a fine needle pressed against aluminium foil and gentle rotated.
It is almost too small to see by eye.

A contour plot of the pinhole image. No sign of astigmatism.

12th February
The secondary, in situ on its holder, has been sent to Orion
Optics who have test facilities that can determine what is going on.
In the
meantime, the 6" reflector is back on the mount. I have never used the 6" on
the ASA mount with guiding before.
Below is an example of a 10 minute
exposure near the core of M31. Stars are nicely round showing that the guiding
is working well.

15th February
The left star contour is from the defective 10" scope. The right image shows well shaped stars, from the 6"

Breaking News: Orion Optics confirm that the
secondary is indeed badly distorted. Arrangements in progress for Orion
to
get the mirror off the holder and affix it in a more satisfactory manner.
Negative image of M31 with the 6". (4x10 minutes).
Stars are pinpoint across most of the frame showing that collimation is good, guiding is working well and the coma corrector is doing its job.

The Foucault tester used to check the main mirror. The aluminium
foil wrapped around the light has the pinhole in it.
The image of the
pinhole is formed adjacent to the pinhole and the knife edge intersects the
light path at the image point.
The observer's eye is placed an inch or two
from the knife edge and sees the 'doughnut ' shape.

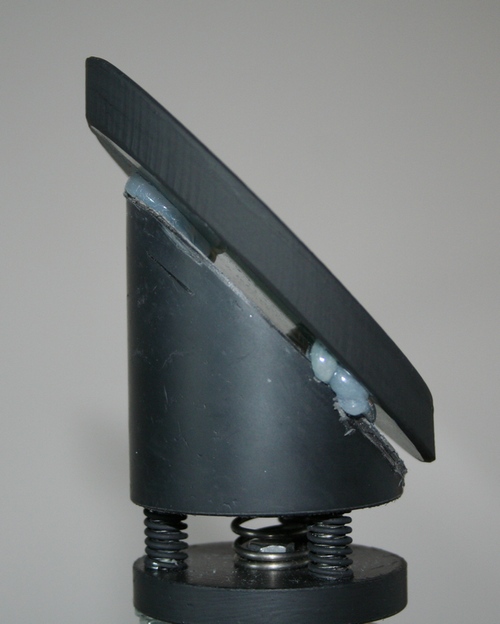
The offending secondary! Gluing the secondary with silicone glue
like this is obviously a bad idea.
I have glued secondaries before, but
have placed a thin layer of chamois leather between mirror and
holder which
has provided sufficient flexure. Should have done that this time too...

24th February
Sheer decadence - two computers and two 24" monitors!
I found superb free software called Synergy which allows both to be controlled with one mouse and one keyboard.
Move the mouse to the edge of the left monitor and it appears on the right.
The keyboard controls whichever computer the mouse is on.
You can even copy and paste between the two!

26th February
M31 (6" scope) image from Feb 12th reprocessed with flats - severe vignetting removed.

March 6th
The flat is back from Orion optics. Their method of attachment is three blobs of silicone adhesive with
a good sized gap between mirror and holder.
 |
Nothing is
easy.... Because the mirror is raised off the holder by 3mm, the holder now has to be 3mm further away from the main mirror. Unfortunately this brings the three adjusting bolts into contact with the spider assembly and the secondary cannot be accurately positioned opposite the focuser tube. Solution - get a hacksaw and saw off a few millimetres from the bolts. The only problem is this has to be done with the mirror in place. Hacksaw blades and the resulting iron filings are not what you want anywhere near the mirror. 6pm: Job done - the mirror survived! Nerves in tatters... |
11th March
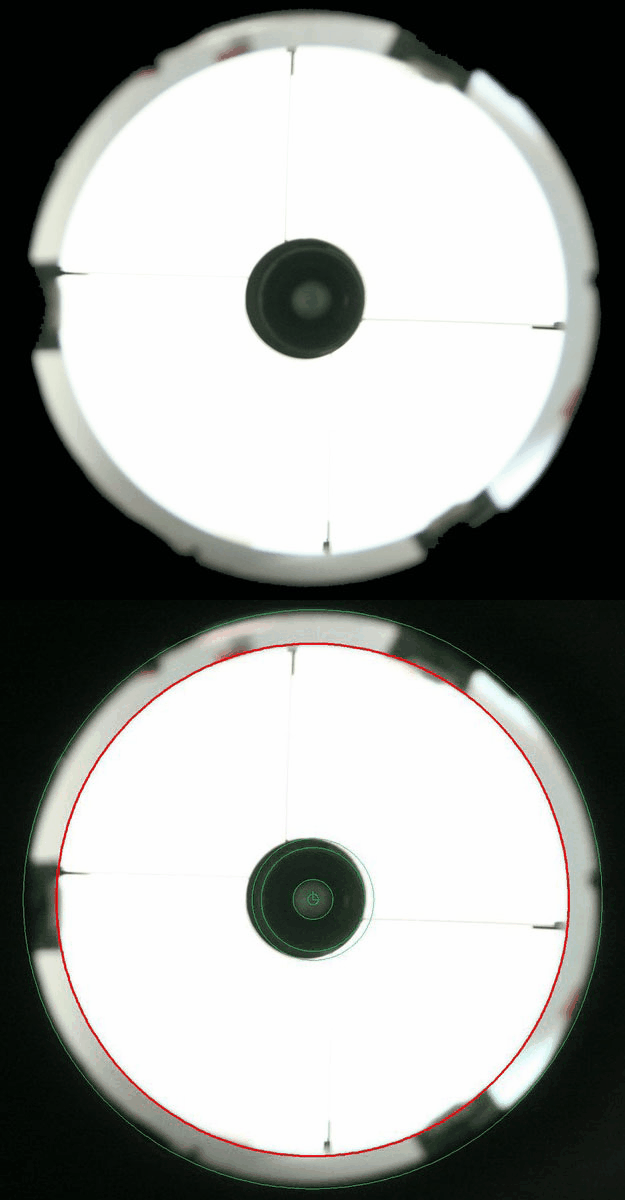
The secondary is back in the scope. This image shows the state of collimation. The camera was held against the
focuser tube and aimed at the centre of the primary. All circles are nicely concentric with the exception of the
outline of the secondary. This is acceptable, as the secondary is deliberately offset.

13th March
Clear skies allowed the secondary to be tested.
First target was Capella, and star images appear good. No uneven flare around Capella and dimmer stars small and round.

Next, the Double Cluster which will give a large number of stars...
Oh no! Odd shaped stars!

I am puzzled by the mishapen stars - they are very like the ones that caused me to investigate the secondary mirror.
I moved to M81. Most peculiar - excellent round star shapes!

Capella and M81 are both high in the sky at present whereas the Double Cluster is low over the house roof. Could warm air rising from the roof be the cause?
| Comparing the 6" scope with
the 10" Theory predicts that the 10" should give smaller star images - this turns out to be true. The 10" has also produced rounder stars, but differences in guiding could account for this. (The10" produces 4 diffraction spikes on stars, the 6" produces 6) |
 |
14th March
The double cluster still gave poor shaped stars. However, I think I have the solution. If the mount pointing model in the area of the Double Cluster is poor, then the mount will have an erroneous idea of where the stars should be. The guiding will attempt to bring the guide star back to the centre, and then the mount will try to move it to where it thinks it should be. The ensuing tug-of-war will distort the star shape. To test this I turned High Precison Tracking off and increased the aggressiveness of the guiding from 3.0 to 7.0 in RA and DEC! The result is reasonably round stars! |
 |
| Out of focus star image. Apart from at the
positions of the three retaining clips, the outlines are
circular. Compare with the defects shown near the top of the page. |
 |
Philipp Keller, who wrote the Autoslew software, is of the opinion that the poorly shaped stars in Perseus are due to the phenomenon of 'tube seeing'.
In a telescope such as a Newtonian, currents of warm air can convect through the upper portion of the tube, and give the stars odd shapes.
This is a region near the Crab nebula, and the same shape is seen. The Crab nebula is also low down in the sky at this time of year.

This video
is such a short time that any movement of the mount can be ruled out. The video shows a 'flaring' off to the top-right of the brighter stars.
This does indeed look like a convection effect.
When the scope is pointing more vertically, the effects of tube seeing are reduced. The solution may be to take the back cover
off the scope tube an hour or two before imaging starts. This will give enough time for temperatures to equalise.
Positioning a small fan to blow air through the tube may also help.
The photo below shows the sealed end of the tube.

28th March
I opened the observatory hatch 2 hours before dark, and removed the plate at the back of the scope.
The first image of the Double cluster showed round stars. I put the plate back and the distorted stars returned.
Tube currents are definitely the problem.
The only problem now is that stray light from computer screens and various LEDs on computers
gets into the scope and finds its way to the camera.

This is with a thick black cloth over the computer screens!

Back cover removed.There is lots of space for light to get in. Some matt black paint in a few places will help, and perhaps some black card baffles...

Black flocking paper applied to the inside of the tube and the aluminium struts painted black.
A paper card circle with a 14cm diameter central hole should allow air to flow through, and keep out stray light.
An additional paper circle might be needed behind the struts...
31st March
The modification appears to be very successful. I imaged the Double Cluster through lots of cloud,
and the stars are perfectly round!

Perseus Double Cluster
15x30 seconds

25th June
Solution to the open rear end of the scope - neodymium magnets hold the back plate securely in position.It is very quick and easy to remove it when needed.